
アプリでのオーバードローの回避
アプリでの「オーバードロー」とは、UI要素が重なっているために、同じピクセルをグラフィックス処理装置(GPU)が複数回レンダリングする状況を指します。アプリのインターフェイスにZオーダー(レンダリング優先度)の近いレイヤーが重なっている場合、GPUは各レイヤーをスタック順に描画します。この描画は、要素の一部がほかのレイヤーで覆われていても(ペインターのアルゴリズムに従って)行われます。このプロセスは、ほかの要素で覆われたピクセルを再描画することにGPUリソースを浪費するため、リソースに制限のあるデバイスでパフォーマンスの問題が発生する原因となります。
オーバードロー検出の構成
アプリのオーバードロー検出を構成するには、アプリの起動オプションの構成を参照してください。プロジェクトの起動オプションに、SHOW_OVERDRAWN=trueと入力します。次に、Vega Studioからアプリを実行します。
オーバードローの結果の解釈
アプリには、オーバードローが色付きのインジケーターで示されます。
| 色 | オーバードローレベル |
|---|---|
| 青 | GPUでオーバードローが1回発生 |
| 緑 | GPUでオーバードローが2回発生 |
| ピンク | GPUでオーバードローが3回発生 |
| 赤 | GPUでオーバードローが4回発生 |
オーバードローを削減する方法
アプリ内のオーバードロー領域を特定したら、以下の最適化手法を使用して、GPUのワークロードを最小限に抑え、レンダリングパフォーマンスを改善します。
ビュー階層のフラット化
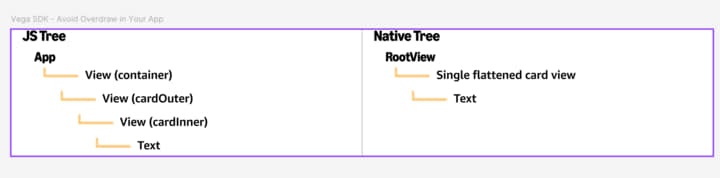
純粋なReactアプリでは、ビュー階層がフラットである方がオーバードローが少なくなります。React Nativeにはビューをフラット化する最適化機能(英語のみ)があり、特定のビューをフラット化して、ネイティブのコンポーネントツリーを自動的に削減できる可能性があります。このアルゴリズムは、backgroundColor、margin、padding、opacityの各スタイルプロパティを調べて、ビューを親ビューにフラット化できるかどうかを判断します。
React Nativeはこの最適化をネイティブに適用するため、JavaScriptから見たコンポーネントのツリー階層は変わりません。したがって、React DevToolsのコンポーネント階層ビューアなどのツールを使用した場合も、JSコードと同じ階層が表示されます。ユーザーの視点からも、目に見える画面の変化はありません。この最適化により、ネイティブビューのレイヤーの数が減少するため、ビューが重なっているピクセルをGPUが複数回レンダリングすることで発生するオーバードローが最小限に抑えられます。結果として、レンダリングパフォーマンスが向上し、UI操作がスムーズになります。
// React Nativeはこのコードをネイティブにフラット化します。

import React from "react";
import { View, Text, StyleSheet } from "react-native";

export default function App() {
  return (
    <View style={styles.container}>
      <View style={styles.cardOuter}>
        <View style={styles.cardInner}>
          <Text style={styles.cardText}>React Nativeによるビューのフラット化の例</Text>
        </View>
      </View>
    </View>
  );
}

const styles = StyleSheet.create({
  container: {
    flex: 1,
    justifyContent: "center",
    alignItems: "center",
    backgroundColor: "#f4f4f4",
  },
  cardOuter: {
    padding: 12,
    borderRadius: 8,
  },
  cardInner: {
    padding: 16,
    borderRadius: 8,
  },
  cardText: {
    fontSize: 16,
    color: "#333",
  },
});
次の図は、JavaScriptのビュー階層と、フラット化されたネイティブ階層との比較を示しています。
透明の回避によるGPUワークロードの削減
透明または半透明のビューでは、透明効果を適用する前にGPUですべての背景レイヤーをレンダリングする必要があるため、オーバードローが発生します。ただし、オーバードローを前提とするシナリオもあります。たとえば、次のような場合が該当します。
- サイドバーメニューをアプリのほかの部分とは異なる背景色でレンダリングする。これはオーバードローにつながります。
- 意図したUI/UXを実現するために半透明のレイヤーを使用する。
可能であれば、アプリの大きい領域に対するオーバードローは最小限に抑えることをお勧めします。カルーセル内のサムネイルサイズのカードなど、小さい領域に多少のオーバードローが発生することは問題ありません。
ベストプラクティス:
- 可能な場合は透明ではなく不透明な色を使用します。
backgroundColorの過度な使用は避けます。- 可能な限り、
backgroundColorはルートレベルで1つ設定し、ビューごとに背景色を設定しないようにします。 - 単色や半透明のレイヤーの積み重ね(たとえば、背景色グレー、背景色白、不透明度、シャドウ)を行わないようにします。
例:
// 非推奨:
<View style={{ backgroundColor: 'rgba(255, 0, 0, 0.5)' }} />

// 単色を推奨:
<View style={{ backgroundColor: 'red' }} />
この例では、0.5はRGBA形式のアルファ値(不透明度)です。透明な要素が重なっている場合、GPUは各レイヤーを個別に計算してレンダリングします。これは、余分な描画操作やパフォーマンスの問題を引き起こします。透明を使用すると、GPUで背景のコンテンツを前景のコンテンツとブレンドすることが必要になるため、GPUのワークロードがさらに増加し、余分な描画操作やパフォーマンスの問題が発生します。
画像の最適化
最適化されていない大きい画像を使用すると、GPUが必要以上に多くのピクセルをレンダリングすることになり、オーバードローが増加します。画像を最適化することで、レンダリングのオーバーヘッドを削減できます。
-
ユースケースに適した画像形式を選択します。
- JPEG: 写真や複雑な画像
- PNG: 透明部分のある画像
- WebP: JPEG/PNGよりも高圧縮
- SVG: シンプルなアイコンとグラフィック
- ディスプレイのサイズに合わせて、適切なサイズと解像度の画像を使用します。画像アセットをさまざまなサイズ(サムネイル、ポスター、全画面)で利用できない場合は、サイズ変更を検討します。
-
異なる画面密度に応じて複数の解像度を使用します。
- 標準解像度ではmy-image.png(1x)
- 解像度が2倍のデバイスではmy-image@2x.png
- 解像度が3倍のデバイスではmy-image@3x.png
- レスポンシブデザインでは、パーセンテージベースのディメンションまたはresizeModeを使用します。これにより、さまざまな画面サイズに合わせて画像が適切に拡大縮小されます。
-
resizeMode: stretchは使用しないようにします。これを使用すると画像がゆがみ、レンダリングオーバーヘッドの原因となります。縦横比を維持するには、「contain」または「cover」を使用します。<Image style={{ width: 100, height: 100 }} source={{ uri: 'image.jpg' }} resizeMode="contain" /> - 複数のアイコンを1つのファイルにまとめると、GPUのワークロードが軽減されます。
画面外のコンテンツの削減
画面に表示されないコンテンツをレンダリングすると、GPUリソースが浪費され、不要なオーバードローが発生します。アプリのコンポーネントツリーを仮想化すると、コンポーネントが画面にレンダリングされていなくても、メモリに存在するコンポーネントを効率的に管理して、画面外のコンテンツを減らすことができます。
仮想化されたコンポーネントの使用:
仮想化されたコンポーネントを使用すると、画面に表示されている項目のみがレンダリングされ、画面外のコンテンツが削減されます。Vegaでは、FlashList(v1とv2)、LegendList、Carousel、その他の純粋なJSリストコンポーネントなど、パフォーマンスに優れた複数の仮想化リストがサポートされています。ユースケースに適した仮想化リストコンポーネントを選択してください。
ベストプラクティス:
- ユースケースに適した仮想化コンポーネントを選択します。
- 大きい画面外コンテンツ領域をレンダリングしないようにします。
- スクロールするまで表示されないコンテンツには遅延読み込みを実装します。
- 非表示のUI要素のレンダリングを削除または延期します。
実装の詳細については、アプリのパフォーマンスに関するベストプラクティスを参照してください。
transformプロパティによるアニメーションの最適化
高さ、幅、余白などのレイアウトプロパティは、アニメーション化するとコストの高い再計算が発生し、オーバードローが増加するため、アニメーション化しないようにします。代わりに、transformプロパティ(英語のみ)(scale、rotate、translate)をアニメーション化します。これらはGPUで実行され、レイアウトには影響しません。アニメーションがネイティブスレッドで実行されるようにするには、useNativeDriver: trueを使用します。
  // 次のようなレイアウトプロパティのアニメーション化は避けます。
  <Animated.View style={{ height: animatedHeight }}>
    ...
  </Animated.View>

  // 代わりに、transformプロパティをアニメーション化します。
  <Animated.View style={{ transform: [{ translateY: animatedTranslateY }] }}>
    ...
  </Animated.View>
要約
アプリでオーバードローを回避するには、まずオーバードロー検出を有効にして、問題を理解することから始めます。測定できないものを修正することが難しい場合は、次の対策に重点を置いてください。
- 画像とアニメーションを最適化する。
- 不要な再レンダリングを減らす。
- 不要なラッパーを削除する。
- FlashListなどの適切なコンポーネントを使用する。
- GPUのワークロードと再処理を削減する。
関連トピック
Last updated: 2025年12月12日