Standard Account Linking
In standard account linking, the user starts the account linking process from the Alexa app and authenticates on your website in a browser. After the user logs in, your authorization server returns an authorization code to Alexa to exchange for access and refresh tokens.
Standard account linking is the most straightforward authorization flow to implement. It doesn't require a companion app or additional API calls beyond the OAuth 2.0 exchange.
Before you begin
Make sure you completed the following items:
- Verify that your authorization server meets the requirements defined in Requirements for Account Linking.
- Configure account linking for your skill using the authorization code grant type. For details, see Configure an Authorization Code Grant.
- Design your log-in page following the guidelines in Best Practices for Account Linking.
How it works
Users can start the account linking process when enabling the skill or from a link account card in the Alexa app. For more about how users interact with account linking, see How Users Experience Account Linking.
Alexa uses the OAuth 2.0 account linking flow with the authorization code grant to link the user's Amazon account with their account in your system. If your token server supports PKCE and you enabled PKCE in the developer console or CLI, Alexa includes the PKCE parameters in the authorization flow for added security.
This flow is the same for both standard account linking and app-to-app account linking starting from the Alexa app. In standard account linking, Alexa uses the configured URI to open the login page on your website. In app-to-app account linking, Alexa uses the configured URI to open the login page in your app, or if the app isn't installed on the device, Alexa uses the website URI as fall back.
Link the accounts
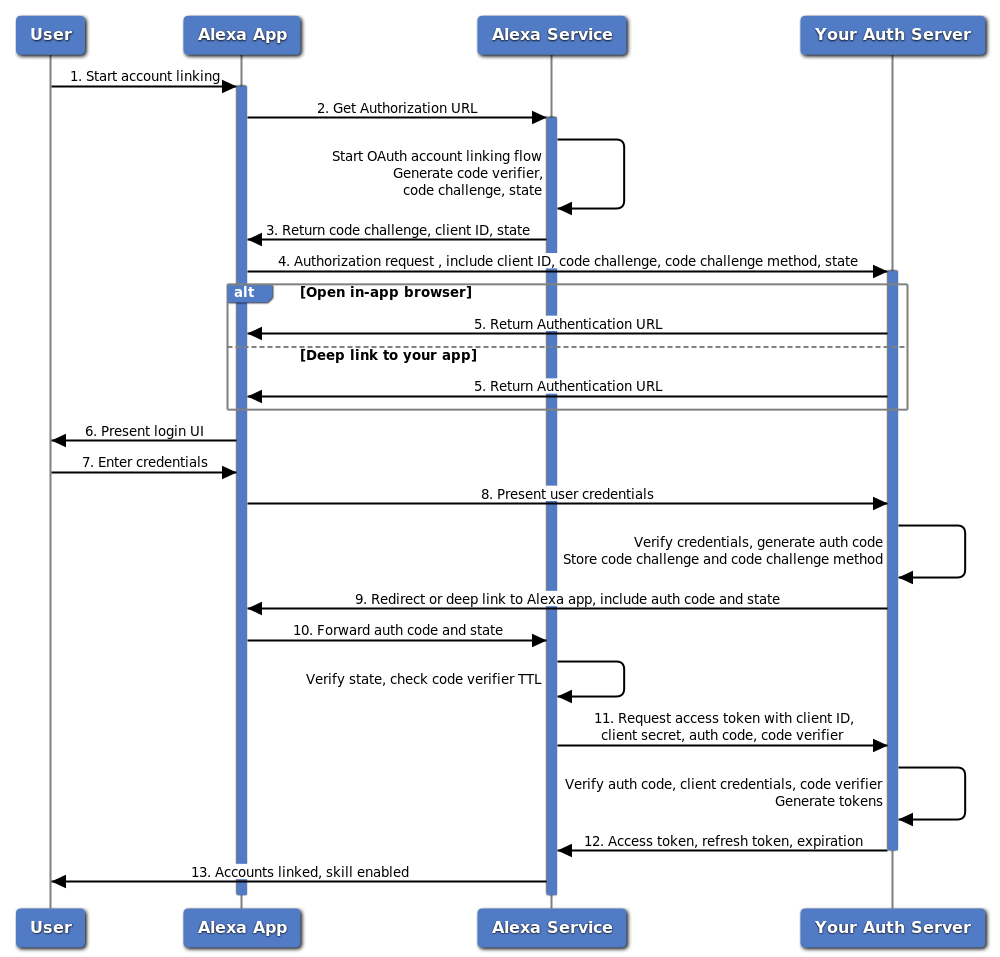
The following steps describe authorization code grant flow to link the user accounts.
- The user starts the account linking process by enabling a skill in the Alexa app. The starting point depends on the type of skill.
- For custom skills, see Account Linking for Custom Skills.
- For smart home, video, or music skills, see Account Linking for Smart Home and Other Domains.
- The Alexa app requests the authorization URL from the Alexa service.
If you enabled PKCE for your skill, the Alexa service creates the PKCEcode_verifier, a unique cryptographic string. From the code verifier, Alexa derives acode_challengeusing SHA-256. - The Alexa service returns the
state,client_id,code_challenge, andcode_challenge_methodto the Alexa app. - The Alexa app makes a request to the authorization URI that you configured for account linking and includes
state,client_id,response_type,scope,code_challenge,code_challenge_method, andredirect_urias query string parameters. - Your authorization server returns the authentication URL to the Alexa app.
For Website URLs, Alexa opens the login page in the in-app browser.
For app-to-app account linking, Alexa deep links to your app. - The Alexa app displays the login page that lets the user authenticate with your server.
- The user enters their credentials for the authorization server.
- The Alexa app returns the user credentials to your authorization server.
Here, the authorization server authenticates the user and generates an authorizationcode. If your authorization server supports PKCE, the server temporarily stores thecode_challengeandcode_challenge_methodparameters along with the authorizationcode. - On success, your authorization server redirects the user to the
redirect_urifrom Step 4 and includesstateandcodein the URL query string parameters. - The Alexa app forwards the
stateandcodeto the Alexa service to verify thestateand the time-to-live for thecode_verifier. - The Alexa service sends the
codeandcode_verifierin aPOSTrequest to get an access token and refresh token pair from the configured access token URI on your authorization server.Important: The authorization server must respond to the token request within 4.5 seconds - The authorization server verifies the authorization
code. If your authorization server supports PKCE, the server must use thecode_verifierto verify the token endpoint based on the stored PKCE parameters as defined in RFC 7636.
If these values match, your server can issue access and refresh tokens. If these values don't match, the server must return an error. - The Alexa service saves the access token and refresh token, and deletes the
code_verifier. The user's Alexa account is now linked to their account in your service, and the skill is ready for use.
The following diagram shows the account linking flow when the user links their account from the Alexa app. Alexa obtains the access token from your authorization server as described in steps 1–13.
Use the access token in your code
After account linking completes, Alexa includes the access token in each request to your skill. For details about how to validate and use access tokens, see Use Access Tokens in Your Code.
Authorization URI details
You configure the authorization URL in the Alexa developer console in the Authorization URI fields.
The Alexa service passes parameters to your authorization server in the URL query string.
For example, if the authorization URI for your page is https://www.ridehailer.com/login, Alexa sends the following parameters:
https://www.ridehailer.com/login?state=abc&client_id=unique-id&scope=order_car+basic_profile&response_type=code&code_challenge=unique-id&code_challenge_method=S256&redirect_uri=https://pitangui.amazon.com/api/skill/link/M2AAAAAAAAAAAA
The Alexa service includes the following parameters in the query string when it opens your authorization URI.
| Parameter | Description |
|---|---|
|
|
An identifier for your skill. You can use this value to provide any skill-specific functionality, such as distinguishing between different skills you have configured with account linking. You define the |
|
|
The Amazon-specific redirection endpoint (redirect URL) to which the service should redirect the user after authenticating the user. The values you can expect for this parameter are also displayed in the Alexa developer console when you configure account linking for your skill. |
|
|
Indicates the type of response to return after the user was authenticated by the authorization server. The |
|
|
An optional list of scopes indicating the access the Alexa user needs. You define these scopes when you configure account linking for your skill for your skill.
|
|
|
A value used internally by the Alexa service to track the user through the account linking process. The Alexa service sends a |
|
|
The hashed value of the PKCE If your authorization server supports PKCE, the Alexa service sends a |
|
|
The method to use to transform the If your authorization server supports PKCE, the Alexa service sends a |
Alexa redirect URLs details
You can find the redirection endpoints for the Alexa app in the Alexa Redirect URLs field on the Build > Account Linking page in the developer console. These endpoints are the URLs to which your log-in page must redirect the user after the user authenticates with your server. The list shows multiple URLs, one for each Alexa region.
Based on where the user registered their device, the Alexa app selects and passes the redirect URL with your authorization URI in the redirect_uri query parameter in the URL query string. Your server must use the redirect_uri to send the user back to the Alexa app after authentication.
For example, if the redirect_uri parameter is https://pitangui.amazon.com/api/skill/link/M2AAAAAAAAAAAA, your login page would redirect the user to the following URL. You pass the state and code parameters in the query string.
https://pitangui.amazon.com/api/skill/link/M2AAAAAAAAAAAA?state=xyz&code=SplxlOBeZQQYbYS6WxSbIA
You typically register the redirection endpoint with the authorization server so that the authorization URI can call the endpoint, especially if you don't own your authorization server. To verify that your skill works from multiple regions, register all the URIs shown in Your Redirect URLs.
How you do this depends on the authorization server you use. For example, in Login with Amazon, you configure a security profile and provide the possible redirect URLs in the Allowed Return URLs field.
To determine the requirements for your server, see the documentation for your OAuth provider.
Access and refresh token details
You configure the access token endpoint for your authorization server in the Alexa developer console on the Build > Account Linking page by entering the appropriate URL in the Access Token URI field.
After a user links their account, the Alexa service sends a POST request to the token URI containing the authorization code, PKCE code verifier, and client credentials. Your authorization server should then generate and return an access token that uniquely identifies the user. This token should be specific to your resource server and created with security in mind. The token should identify the user but remain unguessable. Although the refresh token is optional, if your access tokens expire, Amazon recommends that the server return a refresh token to allow for continued access without requiring the user to re-authenticate.
For access and refresh token requirements, see Access token URI requirements.
For authorization servers that support PKCE, the server must verify that the code_verifier received in the token request matches the stored code_challenge before issuing any tokens. If these values don't match, the server should return an error response.
The following code shows an example access token request from Alexa.
POST /auth/o2/token HTTP/1.1
Host: api.amazon.com
Content-Type: application/x-www-form-urlencoded;charset=UTF-8

grant_type=authorization_code
&code=123456EXAMPLE
&client_id=exampleId
&client_secret=ABCDEFGEXAMPLE
&code_verifier=AB12CVEXAMPLE
&redirect_uri=https://pitangui.amazon.com/api/skill/link/M3PCA6K3O9X0NW
On successful generation of the access and refresh tokens, the authorization server might send the following example response.
HTTP/1.1 200 OK
Content-Type: application/json;charset UTF-8
Cache-Control: no-store
Pragma: no-cache
{
   "access_token":"Atza|EXAMPLEACCESSTOKEN123456...",
   "token_type":"bearer",
   "expires_in":3600,
   "refresh_token":"Atzr|EXAMPLEREFRESHTOKEN123456X..."
}
Testing guidelines
After you configure account linking, you can test the account linking flow. Use the Alexa app to enable your skill and start the account linking process. Verify that you can log in to the service and then return to the Alexa app.
To finish implementing account linking, update your skill code to check for the access token on incoming requests and take appropriate actions. Also, add code to send a link-account card in the response if the user didn't enable or canceled account linking. When displayed in the Alexa app, this card displays a link to your authorization URI. The user can start the account linking process directly from this card.
Next steps
After you implement the authorization flow, see Use Access Tokens in Your Skill Code to handle the access token in your skill's request handler.
For smart home and video skills, see Send Events to the Alexa Event Gateway to understand how your skill sends asynchronous events after account linking.
Related topics
- OAuth.com
- The OAuth 2.0 Authorization Framework (RFC 6749)
- Add Account Linking for Alexa
- Account Linking Concepts
- Best Practices for Account Linking
- Configure Account Linking
- Requirements for Account Linking
Last updated: frontmatter-missing